Replacing a bathtub faucet is an essential skill every homeowner should master. Whether you're dealing with leaks, outdated fixtures, or simply upgrading your bathroom's aesthetic, knowing how to replace a bathtub faucet can save you time and money. This guide will walk you through the process step by step, ensuring you feel confident tackling this home improvement project.
There’s nothing more frustrating than a dripping bathtub faucet. Not only does it waste water, but it can also be a sign of underlying plumbing issues. If you’ve been postponing the replacement, now is the perfect time to take action. With the right tools and guidance, replacing a bathtub faucet can be a straightforward DIY task.
Before we dive into the specifics, let’s address why learning how to replace a bathtub faucet is important. Beyond enhancing your bathroom’s appearance, a new faucet improves water efficiency, reduces maintenance costs, and boosts your home’s overall value. In this article, we’ll cover everything from preparation to installation, ensuring you’re fully equipped to handle the job.
Read also:Mike Love Net Worth The Untold Story Of A Music Icons Financial Empire
Understanding the Basics of Bathtub Faucets
Before you begin the replacement process, it’s crucial to understand the different types of bathtub faucets and their components. This knowledge will help you choose the right replacement and make the installation smoother.
Types of Bathtub Faucets
Bathtub faucets come in various designs, each suited to different bathroom setups. Here are some common types:
- Single-handle faucets: These faucets control both hot and cold water with a single lever, making them convenient and space-saving.
- Double-handle faucets: Featuring separate handles for hot and cold water, these faucets provide precise temperature control.
- Thermostatic faucets: Designed to maintain a consistent water temperature, these faucets are ideal for families with children or elderly individuals.
Components of a Bathtub Faucet
A bathtub faucet consists of several key components:
- Valve assembly: Controls water flow and temperature.
- Spout: Delivers water to the tub.
- Handles: Allow users to adjust water temperature and flow.
- Escutcheon or trim plate: Covers the mounting area for a clean finish.
Preparing for the Replacement Process
Proper preparation is key to a successful bathtub faucet replacement. Follow these steps to ensure you’re ready:
Gather the Necessary Tools and Materials
You’ll need the following tools and materials:
- Adjustable wrench
- Plumber’s tape
- New bathtub faucet kit
- Bucket or towels (to catch water)
- Silicone caulk (optional, for sealing gaps)
Turn Off the Water Supply
Before starting the replacement, locate and turn off the water supply valve. If your bathroom doesn’t have a dedicated shutoff valve, you may need to turn off the main water supply to your home.
Read also:Lauren Lake Net Worth A Comprehensive Analysis Of Her Financial Journey
Drain the Existing Faucet
Open the old faucet to release any remaining water. Use a bucket or towels to catch any water that drips out during the removal process.
Removing the Old Bathtub Faucet
Removing the old faucet requires careful attention to detail. Follow these steps to avoid damaging your plumbing:
Disconnect the Water Supply Lines
Use an adjustable wrench to disconnect the water supply lines from the valve assembly. Be cautious, as some water may still be present in the lines.
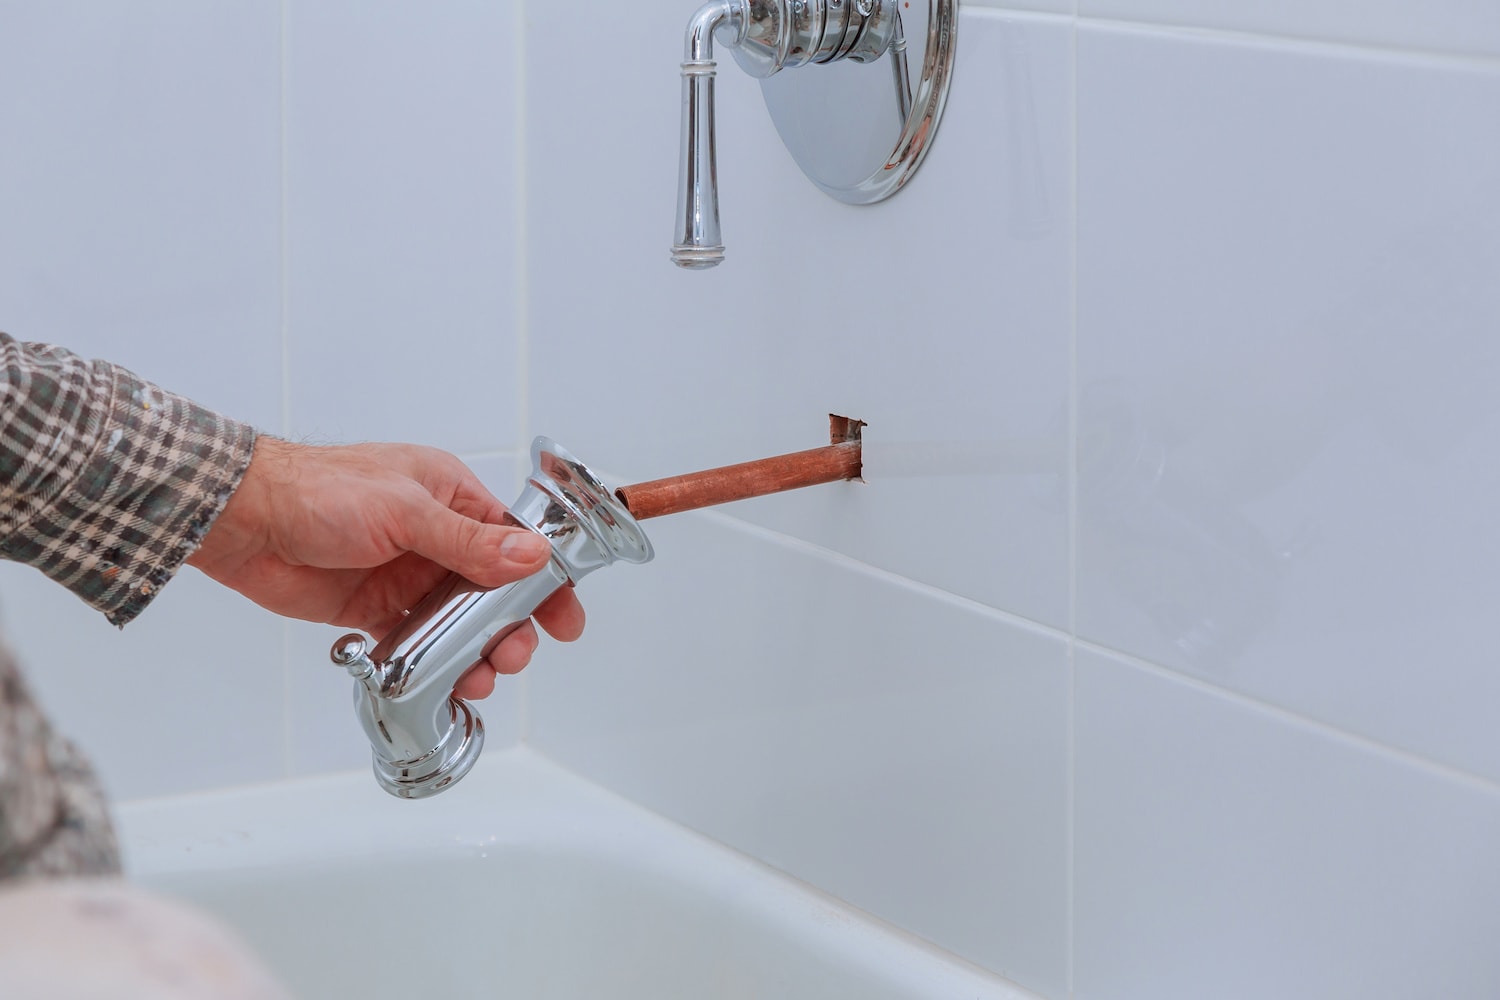
Remove the Old Faucet
Unscrew the mounting nuts that secure the faucet to the wall. Gently pull the faucet away from the wall, being careful not to damage the surrounding tiles or wall surface.
Inspect the Valve Assembly
Check the condition of the valve assembly. If it’s old or damaged, consider replacing it along with the faucet. A new valve assembly ensures better performance and longevity.
Selecting the Right Replacement Faucet
Choosing the right bathtub faucet is critical for a successful installation. Consider the following factors:
Style and Design
Select a faucet that complements your bathroom’s decor. Modern, traditional, or transitional styles are all available, so choose one that matches your personal taste.
Material and Finish
Faucets come in various materials, including brass, stainless steel, and chrome. Choose a durable material with a finish that resists scratches and corrosion.
Compatibility
Ensure the new faucet is compatible with your existing plumbing setup. Measure the distance between the valve centers (centerset) to confirm compatibility.
Installing the New Bathtub Faucet
With the old faucet removed, it’s time to install the new one. Follow these steps for a seamless installation:
Attach the Valve Assembly
Install the new valve assembly according to the manufacturer’s instructions. Ensure it’s securely tightened to prevent leaks.
Mount the Faucet
Position the new faucet over the valve assembly and secure it with the mounting nuts. Tighten the nuts by hand first, then use an adjustable wrench for a snug fit.
Connect the Water Supply Lines
Attach the water supply lines to the valve assembly, ensuring they’re securely connected. Apply plumber’s tape to the threads for a watertight seal.
Testing the New Faucet
After installation, it’s important to test the new faucet for proper functionality:
Turn On the Water Supply
Slowly turn on the water supply valve and check for leaks around the connections. If you notice any leaks, tighten the connections as needed.
Check for Proper Operation
Test the faucet by turning the handles to ensure smooth operation and accurate temperature control. Adjust the faucet if necessary to achieve the desired performance.
Finishing Touches
Once the faucet is installed and tested, it’s time to add the finishing touches:
Seal Gaps with Caulk
Apply a thin bead of silicone caulk around the base of the faucet to seal any gaps and prevent water damage.
Clean and Polish the Faucet
Wipe down the new faucet with a soft cloth to remove any fingerprints or smudges. Polish it to a shine for a professional finish.
Troubleshooting Common Issues
Even with careful installation, issues can arise. Here are some common problems and their solutions:
Leaking Faucet
If the faucet leaks after installation, check the connections and tighten them as needed. Ensure the plumber’s tape is properly applied and replace it if necessary.
Low Water Pressure
Low water pressure could indicate a clogged aerator or valve. Clean the aerator and inspect the valve assembly for obstructions.
Benefits of Replacing Your Bathtub Faucet
Replacing your bathtub faucet offers numerous benefits beyond aesthetic improvements:
- Improved water efficiency
- Enhanced bathroom functionality
- Increased home value
- Reduced maintenance costs
Conclusion
Replacing a bathtub faucet is a rewarding DIY project that can transform your bathroom’s appearance and functionality. By following this comprehensive guide, you can confidently tackle the job and enjoy the benefits of a new faucet. Remember to prepare thoroughly, choose the right replacement, and test the installation for optimal performance.
Now that you’ve learned how to replace a bathtub faucet, it’s time to put your skills into action. Share your experience in the comments below, and don’t forget to explore other articles on our site for more home improvement tips. Happy renovating!
Table of Contents
- Understanding the Basics of Bathtub Faucets
- Preparing for the Replacement Process
- Removing the Old Bathtub Faucet
- Selecting the Right Replacement Faucet
- Installing the New Bathtub Faucet
- Testing the New Faucet
- Finishing Touches
- Troubleshooting Common Issues
- Benefits of Replacing Your Bathtub Faucet
- Conclusion

:max_bytes(150000):strip_icc()/how-to-replace-a-bathtub-faucet-5210836-04-7b7d953ade8141c1a4750f082aad38d4.jpg)
